Amazon Product Research Made Easy
SAS Walkthrough: Profit, Competition, and Red Flags!
If you’re trying to find profitable Amazon products faster (without guessing, overbuying, or getting stuck on risky listings), Christopher Grant’s walkthrough is an awesome tutorial to follow.
In the video below, see how Chris (a 10+ year Amazon seller) shows exactly how to use SellerAmp SAS to research products, calculate profit, avoid common mistakes, and build a sourcing system you can repeat every week – then scroll down to check out a breakdown of the steps!
The Breakdown
Step 1: Start Researching on the Source Website (Before Even Opening Amazon)
One of the biggest time-wasters in online arbitrage is jumping between tabs just to find the correct Amazon match.
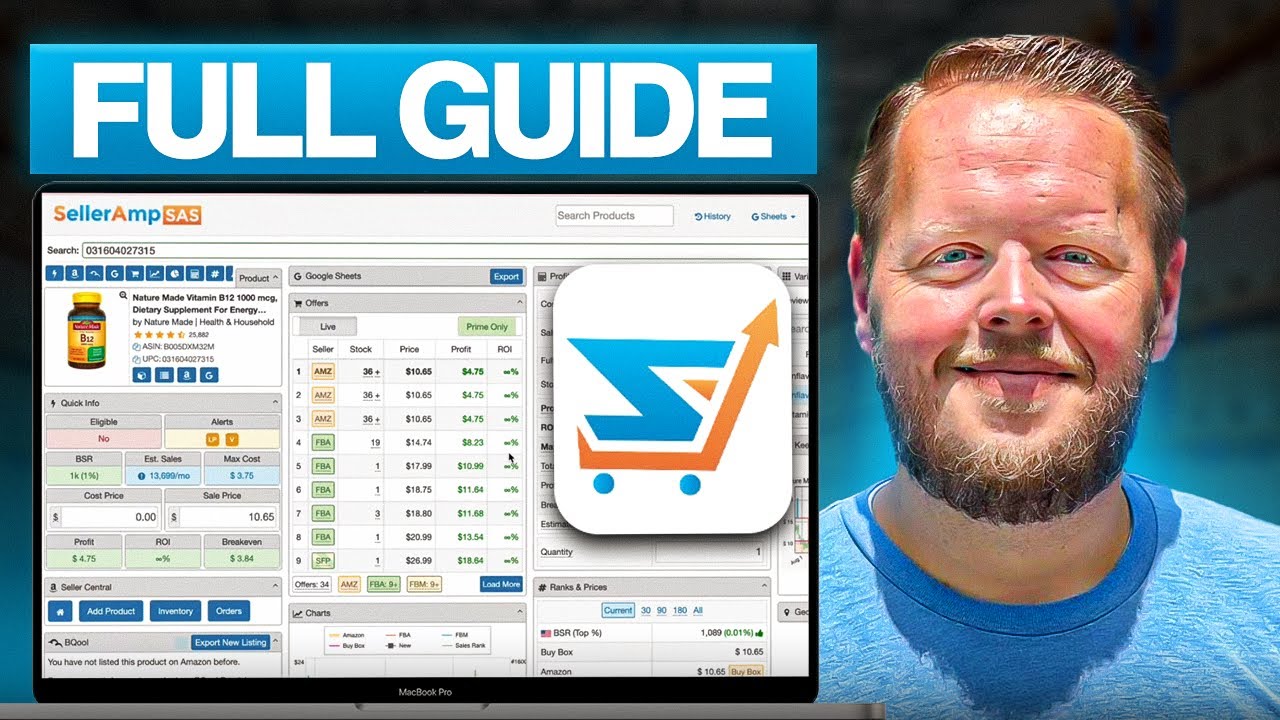
Chris shows how you can open the SellerAmp SAS Chrome extension on a source website and search Amazon by the product title. SellerAmp SAS then pulls matching listings and helps you confirm the correct one by checking the images.
This is also where you’ll see your Max Cost, which is the most you can pay while still meeting your profit and ROI settings.
Step 2: Open the Amazon Listing and Use SellerAmp’s “Quick Info” Panel
Once you’re on the Amazon product page, SAS gives you a fast overview of critical details like eligibility, category performance, and estimated sales data.
Chris uses this section to quickly decide whether a listing is worth deeper research or an immediate “no.” He also recommends verifying certain warnings (like IP risk) with Keepa or tools like IP Alert when needed.
Step 3: Use the Profit Calculator (Including Built-In Cost Math)
Chris walks through the SellerAmp SAS profit calculator and shows a feature that makes research much faster: you can do math directly inside the buy cost field.
For example, you can add shipping per unit, subtract discounts, or apply gift card savings without using a separate calculator. That means you get more accurate profit numbers while sourcing at speed.
Step 4: Adjust the Sale Price to Stay Realistic
SellerAmp SAS pulls pricing from the Buy Box, but Chris strongly suggests adjusting the sale price when necessary.
Why? Because sometimes the Buy Box price is temporarily inflated, and you should base your decision on what the product typically sells for (especially if you’re buying multiple units). This helps you avoid “false profit” buys that turn into dead inventory later!
Step 5: Use Break-Even Price to Control Your Risk
This is one of the most valuable tips in Chris’s entire tutorial.
SellerAmp SAS shows your break-even price, which is the lowest sale price you can sell at without losing money. Chris explains this helps you understand your downside if the price drops, competitors race to the bottom, or the listing becomes more competitive after you purchase inventory.
Step 6: Check Offers and Buy Box Data (Don’t Assume the Lowest Price Wins)
SellerAmp SAS displays offer count and breaks sellers down by FBA vs FBM.
Chris highlights an important reality: the seller with the lowest price is not always the one winning the Buy Box. If you understand how the listing is behaving, you can make smarter pricing and sourcing decisions instead of assuming you need to undercut everyone.
Step 7: Review Alerts (Gating, Hazmat, Dangerous Goods, and Private Label Risks)
Chris recommends using the SellerAmp SAS alerts section to spot issues before buying, including:
- Restrictions and gating
- Hazmat vs dangerous goods warnings
- Private label likelihood
- Suspected IP issues
He also mentions ungating is harder in 2026 than it used to be, but it’s absolutely worth checking whether you can get approved.
Pro Tip: If you’re confused about gating, check out our other post HERE for the rundown!
Step 8: Use Charts to Spot Stability
The SellerAmp SAS chart panel helps you check key trends like price movement, rank history, and offer count changes.
Chris specifically recommends watching offer counts over time. If offers rise and never fall, that can be a sign the product isn’t selling through strongly (or competition is stacking up faster than demand)
Two “Slept-On” SellerAmp SAS Features Chris Recommends Using
- Lookup Details: Save Your Source URLs for Faster Replenishment
Chris calls Lookup Details a “slept-on” feature because it shows every time you’ve researched a product and lets you save the supplier URL(s).
This is a major advantage if you want to build a replenishable-style sourcing system. Instead of scrambling to remember where you found something, you can quickly revisit your past leads and see if they’re profitable again today.
- Buy Box Analysis: Storefront Stalk Past Buy Box Winners
Another feature Chris recommends is Buy Box Analysis, which shows sellers who’ve won the Buy Box over different time ranges.
His strategy: don’t just stalk the sellers currently on the listing – check sellers who used to win the Buy Box but aren’t there anymore. If they were early (before the listing got crowded), they may have better sourcing patterns and smarter product choices.
Bonus Tip: Use Variations Viewer! If a product has multiple variations (like shoes, apparel, or color options), SellerAmp SAS can analyze recent reviews and estimate which variations customers are actually buying most often. Chris shows how this helps you avoid sourcing the “wrong” variation that sells slower or gets stuck in storage.
To Sum It Up: SellerAmp SAS Works Best When You Use It Like a System
Christopher Grant’s main message is that SellerAmp SAS isn’t just about checking profit, though we all want to be banking big bucks; it’s about moving faster and making smarter sourcing decisions consistently.
If you want the best results with SellerAmp SAS, treat it like a workflow tool: track your research, store your source links, learn from Buy Box history, and use your past product history to source more efficiently over time.
New to Online Arbitrage and want a tool that sets you up for success? Try SellerAmp SAS with a 2 week FREE trial, just hit the button below!